I’ve spent decades in the decking industry, and if there’s one thing I’ve learned, a well-maintained deck is the heart of an outdoor living space. Whether for family barbecues, morning coffee, or just a quiet place to unwind, your deck should be safe and beautiful. But over time, even the best-built decks can suffer from wear and tear. This is typically found in wooden decks. Boards crack, warp, or rot, and when that happens, removing and replacing damaged boards is necessary to maintain your deck’s integrity.
If you’re facing this issue, don’t worry—I’m here to guide you through the step-by-step process of assessing deck damage, choosing replacement boards, installing new deck boards, and preventing future problems.
Assessing the Condition of Your Deck
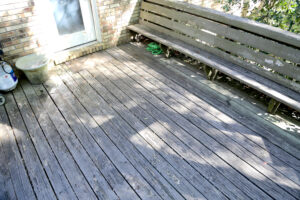 Before jumping into the replacement process, take the time to thoroughly inspect your deck. This is something I always emphasize because identifying problems early can prevent bigger, more expensive repairs down the road.
I recommend walking across your deck and looking for these common signs of deck damage:
- Cracks and Splintering – Wood dries out over time, leading to cracks and splinters that make your deck unsafe.
- Warping and Bowing – If boards are no longer flat, they’ve likely absorbed too much moisture and need replacing.
- Soft Spots and Rotting Wood – A simple trick I use is pressing a screwdriver into questionable areas. If it sinks easily, the wood is rotting and must go.
- Discoloration and Mold Growth – Dark spots or fuzzy patches signal moisture issues, which can accelerate decay.
If only a few boards are damaged, you can replace them individually. However, if you notice widespread issues, especially with the ledger board or substructure, it may be time to consider a more significant repair—or even a full rebuild.
Choosing Replacement Boards
Selecting the right replacement boards is key to ensuring your deck remains durable for years to come. Based on my experience, here’s what you need to consider:
- Material – Match the material you currently have. Pressure-treated wood, hardwoods like cedar and redwood, or composite decking are the most common types of decking boards.
- Size and Thickness – Make sure the new boards match your existing deck dimensions for a seamless fit.
- Durability and Treatment – If you’re dealing with wood, choose pre-treated or sealed boards to help combat moisture damage.
The Composite Decking Advantage
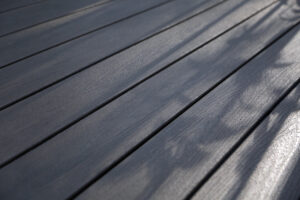 If you’re tired of replacing deck boards altogether, composite decking might be your best bet. I’ve seen firsthand how composite materials have changed the industry. Unlike traditional wood, composite boards resist warping, cracking, and rotting. They’re made from a blend of wood fibers and plastic, offering exceptional durability with little to no maintenance.
One of the biggest perks? You likely won’t ever have to replace a composite board due to wear and tear. Plus, composite decking resists mold, fading, and insect damage, making it a hassle-free option. It also makes cleaning easier—if you ever need to remove pine sap, composite surfaces allow for a much simpler process than traditional wood.
However, there could be a rare occasion when a composite board warps and needs replacement. This may be truer for early-generation composite boards or when boards have suffered from a lack of upkeep. I suggest that homeowners contact their manufacturer immediately to check the warranty on their product.
Steps to Replace Deck Boards
Replacing deck boards is a straightforward process when done correctly. In the following steps, I’ll walk you through removing damaged boards, preparing and cutting new boards, installing new deck boards, and adding finishing touches to ensure your deck looks seamless and lasts for years to come.
Removing Damaged Boards
The first step is clearing off the deck area and removing damaged boards. I like to start by taking out any screws with a drill. If nails were used, a pry bar will help lift the boards without damaging the joists underneath. Be careful—splintered wood can be sharp, so I always wear gloves and protective eyewear during this step. Once removed, be sure to look at the joists to ensure they are still strong and secure.
Preparing and Cutting New Boards
Once the old boards are out, measure the gaps left behind and cut your new boards to the correct length. I strongly recommend sealing the cut edges with a wood preservative if you’re using wood. This small step makes a big difference in preventing future damage.
If you’re unsure how much material is required for your project, using an estimator tool can help ensure you purchase the right amount.
Installing New Deck Boards
Now it’s time to secure the new deck boards in place. I always leave a small gap (typically 1/8″ to ¼”) between boards for expansion and proper drainage. Measure the distance between undamaged boards on your deck to get the right gap. Using corrosion-resistant screws or nails is also a must to ensure longevity.
Finishing Touches
To give your deck a polished look, check that the edges of the new boards align neatly with the rest of the deck. If needed, use a sander to smooth out rough edges. A clean, uniform finish makes all the difference.
Cleaning the Deck
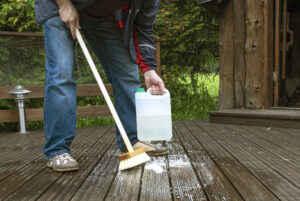
Once everything is installed, I like to give the entire deck a good cleaning. A simple sweep or soap and soft brush removes dust and debris, and if you’re working with wood, a final sealant application will enhance its protection against the elements.
Maintenance Tips for Preventing Future Damage
I always tell homeowners that replacing deck boards is just one piece of the puzzle. Keeping your deck in great shape requires ongoing maintenance.
Here are a few of my go-to tips:
- Apply a Sealant or Stain – Protect wood from moisture and UV damage with a high-quality sealant or stain. This isn’t needed for composite boards since the protective seal is applied in the manufacturing process.
- Inspect Your Deck Regularly – Look for loose fasteners, signs of rot, or water damage before they become bigger problems. Following International Building Code standards for structural integrity ensures your deck remains safe.
- Use Trex® Protect and Trex® Seal – These water-proofing products safeguard your deck’s ledger board from moisture, preventing rot and decay. They also provide superior protection compared to traditional deck ledger flashing.
- Keep Up with Regular Deck Safety Checks – Ensuring your deck is in good condition is critical, especially in high-traffic areas. Learn more about deck safety to avoid long-term damage and costly repairs.
- Clean Your Deck – A gentle cleaner and a soft brush will help remove dirt, mold, and mildew buildup.
By taking the time to inspect, maintain, and protect your deck, you can extend its lifespan and enjoy it for years to come. Speaking of lifespan, have you ever wondered how long a deck lasts? The answer depends on materials and maintenance, but proper care will ensure you get the most out of your outdoor space.
I hope this guide gives you the confidence to take on your deck repair. With the right approach, your outdoor space will look as good as new in no time.
Sources:
Decks.com, “How to Replace Deck Boards & Repair Your Deck,” Dec. 31, 2010
https://www.decks.com/how-to/articles/how-to-replace-deck-boards
Better Homes & Gardens, Kamron Sanders, “How to Replace a Deck Board,” Aug. 10, 2022
https://www.bhg.com/home-improvement/deck/building/how-to-replace-a-deck-board/
Family Handyman, Mike Berner, “How to Replace Deck Boards,” Oct. 7, 2024
https://www.familyhandyman.com/project/replacing-deck-boards/
Trex Protect, Dave Kile, “Does Composite Decking Warp”
https://trexprotect.com/blog/does-composite-decking-warp/
Trex Seal, Dave Kile, “PVC vs Composite vs Wood Decking: Which is Best?”
https://trexseal.com/blog/pvc-vs-composite-vs-wood-decking-which-is-best/