 After decades in the deck industry, I’ve seen just about every deck-building mistake imaginable—from improper ledger board attachments to poorly anchored posts that put the entire structure at risk. Sure, we all admire a good-looking deck, but a well-built deck is a must if you want top-notch safety, longevity, and value.
In this article, I highlight some key mistakes I’ve encountered in deck construction and share the correct building techniques that ensure your new deck is safe, solid, and built to last. I also provide some advice on finding a competent contractor.
Common Deck Construction Errors
Deck-building seems straightforward—you cut some boards, drive some screws, and call it a day. In reality, the details matter a great deal, and seemingly small missteps can lead to costly, even dangerous, consequences. Let’s break down the most frequent errors and how to prevent them.
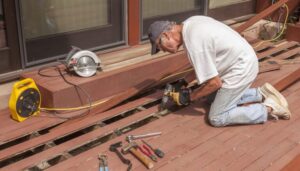
Improper Ledger Board Installation
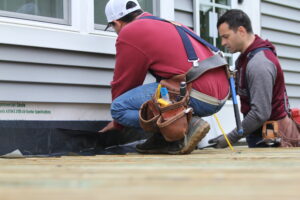
 The ledger board attaches the deck to the house and is a critical anchor point. (Footings, discussed in the next section, are another.) The most common mistakes related to the ledger are using undersized fasteners and failing to attach the ledger to the house’s structure. Poor flashing over the ledger is another common error.
How to Prevent It
Suitable fasteners include lag screws, through bolts, and structural screws. Traditional lag screws, at least a half inch in diameter, have a hexagonal head and coarse threads. To prevent splits in the ledger, drill pilot holes for the lags and use washers.
Through-bolts, which require drilling full-diameter holes through the ledger and the house’s rim joist, are a more time-consuming method but make the strongest connection.
Structural screws are a convenient fastener because they don’t require pilot holes. Just be sure you follow the manufacturer’s instructions about the number of screws and their spacing.
Be sure the lag screws and through-bolts are made of hot-dipped galvanized steel or stainless steel. Structural screws use a different type of coating.
Whatever fasteners you use, they must reach the house’s structure, typically the rim joist. Do not attach the ledger to the house’s siding or sheathing. In fact, a portion of the exterior cladding is typically removed so that the ledger can be anchored properly. For more details, including flashing methods, see my previous article on how to attach a ledger board to a deck.
As for flashing, it’s difficult to protect a ledger from water using only rigid flashing, which is why we developed a specialized flashing tape for the job. Our product not only offers superior protection to traditional ledger flashing it’s also easier to install.
Insufficient Footing Depth
 Several factors determine the required footing depth: the frost line, soil type, site slope, and load requirements. Ultimately, your local building code will dictate the required depth, which could be 48 inches or even more. If you live in a temperate region where precast foundation blocks are acceptable, they must still be sunk into undisturbed soil, not set on backfill or landscape rocks. Freestanding decks, which have no ledger board, might require going down 10 feet or more to find undisturbed soil when digging near the house.
How to Prevent It
Never place concrete in the footing holes until they’ve been inspected and approved. Otherwise, the inspector can’t assess the depth of the hole and the actual soil conditions. If clay, loose sand, or poorly compacted soil is present, deeper or wider footings or the addition of a gravel base could be required. Use rigid, regular forms to ensure the footings are plumb and reach the required depth.
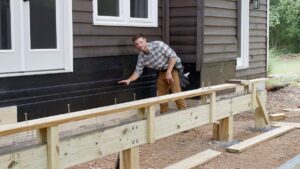
Incorrect Joist Spacing
 If joists are spaced too far apart, they can’t provide the rigidity and safety that every deck requires. While 16 inches on center is considered standard joist spacing for many construction jobs, the actual joist spacing your deck requires depends on several factors.
How to Prevent It
Plan the joist spacing based on the type of decking you plan to use and the load that the deck must carry. For pressure-treated wood decking, 16-inch spacing is typical. However, composite decking or thin decking requires 12-inch spacing or less. If the deck must support a hot tub, large planters, or other heavy items, closer spacing or double joists could be required. When using composite decking as stair treads, reduce the spacing to 10 inches. Cantilevered decks and picture-frame or diagonal deck boards could require tighter spacing, especially at the deck edges.
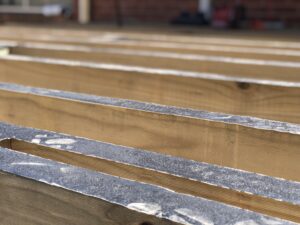
Poor Drainage and Ventilation
Drainage and ventilation prolong the service life of decks by dissipating moisture, the primary cause of wood decay. Damp wood can also attract boring insects and cause fasteners to corrode prematurely. Decks that are near ground level are especially susceptible to poor drainage and ventilation.
How to Prevent It
Stop drainage and ventilation problems before they start by leaving gaps of 1/8 to ¼ inch between the deck boards. This allows water to pass through and air to circulate. If possible, maintain at least 12 inches of clearance between the deck and the ground or add vents that promote air circulation to prevent moisture buildup. Pitching the deck slightly (1/8 inch per foot) will also reduce the amount of water that can pool on the deck boards. To prevent runoff from pooling around the footings, posts, and stairs, grade the area around the deck to slope away from the house.
Using the Wrong Fasteners
 Choosing the wrong fasteners for the ledger, posts, joists, or deck boards will, at minimum, shorten the deck’s service life. At the extreme, it could lead to catastrophic failure, injuries, and death.
How to Prevent It
This is an easy one: Follow the manufacturer’s instructions. This applies to the nails used to secure joist hangers as well as the screws and hidden fasteners that connect the deck boards to the structure. Use only corrosion-resistant fasteners, such as hot-dipped or coated screws that are suitable for pressure-treated wood. Stainless steel is appropriate in coastal areas and high-moisture environments. While using the right fasteners is paramount, it’s probably the easiest of the material selection challenges you’ll face.
Unsafe Stairs and Handrails
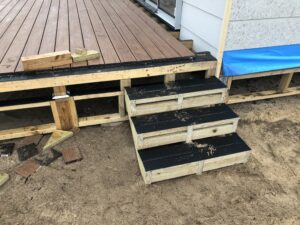 Even code-conforming stairs come with a higher risk of falls, and the danger only increases when the installation is subpar. There should be no bounce in the treads and no wobble or give at the handrail.
How to Prevent It
To minimize tripping and meet the building code, stairs must have a uniform rise (around 7 inches) and run (at least 10 inches). They must also be rigid, so use as many stringers as necessary to ensure the spacing doesn’t exceed 16 inches for wood stairs or 10 inches for composite stair treads. Use the correct hardware to connect the stringers to the deck structure. For the handrail, place blocking within the stair structure so that the fasteners in the handrail post stay firmly anchored. The handrail must also be easily graspable, uninterrupted along its length, and installed between 34 and 38 inches from the stair nosing. It’s also good practice to install a solid landing pad at the base of the stairs and to add lighting around the area.
Choose the Right Contractor
 Everyone likes saving money, but don’t choose your contractor on price alone. Instead, set a budget and seek bids from licensed, insured, and experienced contractors only. Otherwise, you won’t get a warranty, and you risk hiring a contractor who does a poor job, doesn’t return your calls, or disappears with your down payment. Be sure to check references before making your final decision. If you want to save money, ask the contractor if you can do some of the work yourself, such as staining the deck. Find a builder.
Permits and Compliance
Don’t even think about cutting corners on permits, licenses, and insurance. The risk-reward ratio is against you. For instance, building code violations could include fines and penalties, including having to remove and rebuild the deck at your own expense. You could also be liable for medical expenses if an uninsured worker gets injured on your property. You also risk having to accept poor workmanship, which could lead to a premature deck failure that injures someone. These liability risks far outweigh any savings upfront.
Tips for DIYers and beginners:
- Visit your local building department before settling on a specific deck design
- Seek pre-approved deck plans to simplify the process
- Ask inspectors for guidance, and
- Take your time and follow the permit and inspection process.
Conclusion
Deck construction has many important details, but there’s no reason to worry. By hiring professionals who use high-quality materials and whose work meets or exceeds the building code, you’ll avoid every mistake I describe here.
The next step is to keep your well-built deck in good repair. I suggest you inspect your it annually to ensure it has developed no structural integrity issues and remains safe for you and others to use. For more details on how to do it, see my article on deck inspection and this report from the professional home inspectors at InterNACHI.
Sources
TrexSeal. How to Attach a Ledger Board to a Deck. Retrieved March 26, 2025, from https://trexseal.com/blog/how-to-attach-a-ledger-board-to-a-deck
TrexSeal. Flashing tape: A superior alternative to traditional ledger flashing. Retrieved March 26, 2025, from https://trexseal.com/blog/flashing-tape-a-superior-alternative-to-traditional-ledger-flashing
Sonoco. SonoTube concrete forms. Retrieved March 26, 2025, from https://www.sonoco.com/na/products/industrial-products/tubes-cores/sonotube-concrete-forms
FastenMaster. Structural Screws for Ledger Board 101. Retrieved March 26, 2025, from https://www.fastenmaster.com/blog/structural-screws-for-ledger-board-101
Decks.com. Deck installation: 10 Common Deck Building Mistakes & How to Avoid Them. Retrieved March 26, 2025, from https://www.decks.com/how-to/articles/common-deck-building-mistakes
International Association of Certified Home Inspectors. (n.d.). Deck inspections. Retrieved March 26, 2025, from https://www.nachi.org/deck-inspections.htm